Showing posts with label cakes. Show all posts

Sunday, June 13, 2010

Stuff in the Fridge Sunday: Rainbow Cake and Nachos...?

I got ambitious and decided I wanted to try my hand at a Rainbow Cake!! I've been seeing so much about them on the internet, I figured, 'how hard could this be?'

I suppose we shall see. We went to the store to get more food paste for the colors (all the colors of the rainbow!) and gathered some extra things we needed for dinner, then it was to the Kitchen of Despair for an adventure!

Suze's Wedding Cake*

What We Used:
  • 4 eggs
  • 1 and 1/3 cups milk
  • 4 cups flour
  • 2 cups sugar
  • 1 tbsp vanilla
  • 5 tsp baking powder
  • 1 tsp salt
  • 1 cup softened butter
First step was to grease and flour the pans. We then beat the eggs with 1/3 cup of milk and the vanilla and set this aside.

We stirred together the dry ingredients (flour, sugar, baking powder and salt) and beat in the butter in what appeared to be a modified version of 'cutting the butter in.' This is a new recipe, but the effect of what seemed like a strange way of doing things at the time turned out nicely. and remaining milk at medium speed.

Okay... the batter did something really weird here. It started looking a little like bread dough. We thought we were doing something wrong, but adding in the egg made it look marvelous. Do this in three batches, scraping down the sides as you go.

Once it was all mixed, it was time to break out the food coloring. We put about a cup and a quarter of batter into a different bowl and added the red food coloring, then repeated with the orange, seeing as it was easier to do two colors at a time. The batter looked great! Food paste totally rocks! Continue mixing colors till you've got the whole rainbow... Red, Orange, Yellow, Green, Blue and Purple! (though, you can do only a few colors, if you so choose. Some people only do three or four, we're just crazy.)

We scooped the batter into the prepared pans and spread it as flat as we could, then baked it in the oven at 350 degrees for approximately 12 minutes. We had to watch them really closely because they were so thin.

Put them on a cooling rack and when they're all done cooling, ice the layers and the top with buttercream icing. We piped some decorations and used crushed and whole Smarties to make our cake look extra rainbow-y!

Verdict?

Very sweet and buttery. This isn't the type of cake that you can have a big piece of... We shared a single piece and still had trouble finishing it!

*Our friend Suze is a very colorful individual. We've joked in the past about making her a garish wedding cake, and this might just be the scary prototype.

Nachos

What We Used:
  • Blue Corn nacho chips
  • 1/3 can refried beans
  • 2 cups cheese
  • 2 chorizo sausages, uncased and ground
  • Homemade salsa
  • 2 avocados
  • sour cream
  • chili paste
I prepared the salsa in advance, and mashed up the avocados to make guacamole. I usually add extra garlic into the guac, but with how much garlic was in the salsa, I didn't bother this time. What you do to make guac is just mash the avocados then add salsa in to taste. It's quick and easy and really healthy!

We made some spicy sour cream to go with it, too, by adding the chili paste into the sour cream.

Grate the cheese, uncase and grind up the chorizo, prepare your refried beans, then layer it all on top of the corn chips and shove it in the oven. Then sprinkle on some salsa, drizzle on some spicy sour cream, add a dob of guacamole and you're ready to go!

-Sam

Monday, June 7, 2010

No Doctor Who night? Lasagna with Mr. Science!

Due to Wine-ing Philosophers taking up Carmen's time this Monday, we asked Mr. Science to guest star on the blog (he's been itching to make lasagna for a while now... what a good excuse!)

Lasagna A La Mr. Science


What We Used

Sauce
  • 2 1/2 lbs lean ground beef (Mr. Science prefers extra lean, but admits you need some fat to help everything stick together)
  • 5 or 6 roma tomatoes
  • 2 cans tomato paste
  • 1/2 yellow onion
  • 5 cloves garlic
  • 1 tbsp oregano
  • dash of marjoram
  • dash of thyme
  • 4 sticks celery
  • 1/4 cup fresh parsley
  • 3 brown mushrooms
  • 5 white mushrooms
All the Rest of it
  • 3 brown mushrooms
  • 5 white mushrooms
  • Lasagna noodles (We used fresh ones, not homemade, but fresh)
  • A large tub of baby spinach, chopped
  • A bit of butter for cooking the spinach
  • 2.2 lbs Ricotta cheese (or two large containers)
  • Mozzarella cheese, grated (we used a large block of it, you can use however much you'd like)
Saute the onions and garlic in a pot, then add the ground beef and spices. Brown the beef. Chop the tomatoes, mushrooms, parsley, and celery and stir them in. Let everything simmer for about 20 minutes then add the tomato paste.

Slice the additional mushrooms and set them to the side. Mr. Science says that adding in raw mushrooms to the layers gives you better texture and taste.

Chop all the spinach and fry in a pan with a bit of butter until the spinach is cooked. It will cook down a LOT, so don't be intimidated by how much you've got. Mix the spinach once it's cool with the ricotta cheese and set aside.

Once everything is ready to go, it's time to layer it. Mr. Science used a stoneware casserole dish for his lasagna, and greased it before beginning to assemble the lasagna. Assembly goes as follows...
  1. Noodles
  2. Sauce
  3. Mushrooms
  4. Noodles
  5. Spinach
  6. Noodles
  7. Sauce
  8. Mushrooms
... and etc, etc, until you've got all your ingredients used up! Top with cheese! Bake covered with aluminum foil in the oven at 375 degrees for thirty five to forty five minutes. Bake for five minutes uncovered or until cheese is browned.

Just as a note, using fresh noodles will actually cut down on cooking time, because you don't have to wait for the dried noodles to cook!

Verdict?

Super awesome! We all agree that it could've used...something. Egg in the ricotta layer? Eight more bulbs of garlic? salt? bay leaf? Dunno. But then again, that's the glory of experimentation!

Home Made Strawberry Shortcakes


What We Used

Shortcake
  • 3 cups flour
  • 1/2 cup sugar
  • 3 tbsp baking powder
  • 1 cup butter
  • 1 egg
  • 2/3 cup cream
The Rest of it
  • Strawberries
  • Sugar
  • Whipping Cream
  • Vanilla extract
Mix flour, sugar and baking powder in a bowl. Cut in butter with pastry cutter or a fork, then stir in egg and cream. Knead until it's one solid lump of dough.

Grease a cookie sheet, and place dough in 1/2 inch thick discs on it. Bake at 350 for about 20 minutes or until slightly brown on top.

While the shortcake is baking, slice the strawberries into a bowl and sprinkle a couple teaspoons of white sugar over them. Set those aside. Whip the whipping cream with a little sugar and vanilla to taste. Cover and refrigerate.

When you're ready to eat the shortcakes, slice them in half like you would a bagel. Layer some strawberries and whipping cream on the bottom half, place the top half of the shortcake back on, then put a little more of the strawberries and whipping cream on top.

Verdict?

Tasty! The shortcake was just sweet enough, without being too overwhelming.

Anyway, good night for now, see you in the morrow and ecetera...

-Jess

Friday, May 28, 2010

Schnitzel and Kate's B-Day Cake

Greetings! It is Sam tonight, bringing you Stuff in My Fridge Friday!

Since I went through the fridge in the Kitchen of Despair yesterday and found that I have an awful lot of extra ingredients I don't know what to do with, I decided to make something out of the leftovers. Since we had an extra pork tenderloin and some extra white potatoes, we decided upon Schnitzel and Potatoes Anna. Both very simple and quick and TASTY.

What We Used:

Schnitzel

  • 1 pork tenderloin
  • 1 and 1/2 cups fine bread crumbs
  • onion powder
  • garlic powder
  • parsley
  • Cayenne pepper
  • chili powder
  • basil
  • Seasoning salt
  • egg wash (egg with a bit of milk in)
Easiest way to turn a pork tenderloin into schnitzel is this: Cut the tenderloin into three or four pieces, depending on the size you want to make your schnitzel. Put the pieces of pork, one at a time, into a freezer bag and pound on them with something heavy ( I opted for my marble rolling pin and found it INCREDIBLY easy ) until they're flat. Don't flatten them TOO much or you'll make them into mush or break them. Once they're flattened, set them aside on a plate or a piece of plastic or tin foil or whatever is available.

In a bowl, mix the bread crumbs and all the spices together. ( This is just the particular blend of spices that I used, if you'd like to do something else with them, by all means, go ahead! Sometimes, my husband and I just use premixed Roasted Red Pepper and Garlic stuff or if I want something more fragrant and earthy, I leave out the onion powder, basil, chili and Cayenne and opt to use rosemary, thyme and oregano. Experiment! That's what spices are for!! ) Set them aside and prepare your egg wash.


Since I had leftover eggwhites in the fridge from previous adventures, I used those!


Dip the flattened pieces of pork into the egg wash, then into the bread crumbs to coat them. Fry them in hot oil until they're cooked, browning them as much as you'd like!!


Potatoes Anna

  • 3 white potatoes, skin on
  • 1/4 onion
  • Salt and Pepper
  • Oil ( I will be using Olive tonight since it's got the most flavor. Use what you have or what you like! )
Slice the potatoes thin and arrange them in a baking dish. I used a Pyrex pie plate, since Pyrex pretty much rocks. Season the potatoes with salt and pepper and sprinkle them liberally with oil. You can use as little or as much as you want, just don't go crazy with it or you'll start your oven on fire. Unless that's just me.


Cut the onion into strips and arrange over the potatoes, then bake in the oven at 350 till the potatoes are soft, browning them as much as you'd like. If you don't want to brown them too much, try covering them with tinfoil or baking them in a roasting pan with a lid.


We're also making a cake for Kate's birthday!! Our lovely friend Kate requested a chocolate cake, so we decided to do something wonderful. Using the same chocolate cake recipe that spawned the TARDIS cake we made a chocolate cake with whipped cream filling and Ganache on top.


Mint Ganache

  • 6 squares Bakers chocolate, chopped
  • 1 cup Heavy cream
  • Mint extract

Chop your bakers chocolate and put it into a heat friendly bowl. Put the cream into a pot heat it on low on the stove. Once the cream is hot, pour it over the chocolate, stirring all the while. Add the mint extract and continue stirring until it's nice and velvety smooth. Pour the genache over the cake, using as little or as much as you'd like!

We don't have any pictures of the cake right now... Megs was lovely enough to take a couple at Kate's thing, so hopefully we can show you soon. But it turned out lovely and dericious.

-Sam

Thursday, May 27, 2010

Guest cook night: Mina!

Mina has a strange allergy. Mina is allergic to grains. Not a gluten allergy or something like that, but a wierd annoying all encompassing grain adversion. This makes things difficult when you're not a big cook and your repertoire is limited to salads.

We needed something easy but tasty to go with for this one, and figured ultimate fries from scratch might be fun.

Ultimate Fries

What We Used:
  • Potatoes (white with skin on)
  • Oil (grapeseed is my oil of choice, but another low-flavor oil like canola would work)
  • 1 lb Ground Beef
  • cumin
  • coriander
  • garlic powder
  • black pepper
  • Chili powder
  • Salsa*
  • Cheese
*Salsa (we opted to go home made for the salsa, so here's what we used)
  • 3 Tomatoes (roma)
  • 4 Cloves of Garlic
  • 1 Jalapeno Pepper
  • 2/3 Onion (we had more sweet onion left over)
  • 1/2 Red bell pepper

Note that there's usually cilantro in fresh salsa, but I got this frightening look on my face when it was brought up, so Jess dropped the subject.I LOATHE THE STUFF. I had to cut a large bucket of it by myself in college. BLECH!)

Mina acted as my sous chef tonight for chopping up the Salsa ingredients. I started with the tomatoes, then did the peppers and onions, dicing everything up nice and small. You can opt for a chunkier salsa if that's what you'd prefer. When it comes to the jalapeno's, if you want it to be REALLY hot, you can keep in the white inside of the pepper and the seeds, since that's where the heat really comes from. I'm a bit of a weenie and opted to scrape the white and the seeds out before dicing it up. My husband also has a bit of a time with spicy stuff and since he needs to eat as well, we went with mild.

To make Garlic easier to cut, try pressing it with the flat side of a chef's knife. The skin will come right off without problem! And pressing garlic releases more flavor. Chop it all up fine, stir the ingredients together in a bowl and let it sit and blend flavors while preparing the fries!

Cut the potatoes into fry shaped pieces. Easiest way to go about this is to cut them length wise, then in thin spears. Heat plenty of oil in a pan since you're pretty much deep frying these things to start them off. When the oil is hot, put the spears into the oil a bit at a time ( and you can do this by either placing them in with your hand if you're brave and slightly heat proof like myself and Jess, or you can use tongs or a spatula if you're not used to it, like we had Mina do ) and cook them till they're a golden color and soft. If they're getting too dark, just turn the heat down. Salt the lovelies as you go, either when they're in the pan or out!

Cook the ground beef with the spices until it's cooked through. Then it's time for assembly!!

Put the fries in the bottom of a pan that's broiler proof. Put the ground beef over top the fries, then the salsa on top of the beef. Cover it all with cheese and put it into the oven until it's a delicious melty hot mess. YUM.


Meanwhile, I was getting started on the cheesecake. The lack of flour in everything but the crust made it an ideal treat and GOD I love cheesecake.

(too much. Much too much)

The recipe is out of some old book, but it's been changed and adapted and handed off to me by my mother, so here's the version I use

Orange Chocolate Cheesecake

Crust

  • 1 1/2 cups Oreo cookie crumbs
  • 1/4 cup white sugar
  • 1/3 cup butter melted
Filling
  • 3 packages cream cheese, softened
  • 1 cup white sugar
  • 5 eggs
  • 2 tbsp orange liquor (we use Grand Marnier)
  • 2 squares semi-sweet baking chocolate
I preheated the oven to 350 as soon as Sam was done with the broiler.

For the crust I mixed the oreo crumbs and sugar together, then added the melted butter. All of this was pressed into the bottom and a little up the sides of a springform pan, then baked for 10 minutes.

While the crust was baking, Sam and Mina were mixing the cream cheese and sugar. Once the cheese and sugar was smooth, we added the eggs one at a time, then the orange liquor.

I melted the baking chocolate in a glass measuring cup in the microwave, because I'm impatient and didn't want to use the double boiler. We added one cup of the cheese mix to the chocolate and mixed well.

When the crust was cool(er), the (not chocolate) cheese mix was poured into the pan on top and smoothed. I then spooned little blobs of the chocolate on top, and cut the blobs with a knife to make a marbling effect. The cake was put back in the oven for 55-60 minutes with a pan of water to keep the air moist.*


*Most cheesecakes call for a water bath, which involves wrapping the bottom of a springform pan in tin foil then placing in a pan of water to avoid warping. I've never had warping problems with this recipe but I do get cracks occasionally, so I like to put something with water in the oven to keep the heat in there nice and moist.

I LOVE this cheesecake recipe. It's a bit more fun that traditional new york style, and the crust is probably my favorite ever. Too bad the Kitchen of Despair's oven is too hot and we ended up overcooking the stupid thing.

This is my angry face.


See? Too dark.

What the N00b learned:
  • The oven is too hot.
-Sam and Jess

Tuesday, May 25, 2010

Soup and Sandwich Combo

Post dropping off resumes and doing some email work, we decided that today's big project was going to be a highly experimental Orange Raspberry Coffee Cake for Clara. The decision was also in part because we left all our tips and icing bags in the Other- Other Kitchen (ie: My house.) and we were looking for something that didn't involve frosting.

ORANGE RASPBERRY COFFEE CAKE

What We Used
  • 2 cups flour
  • 1/2 cup white sugar
  • 2 tsp baking powder
  • 1/2 tsp salt
  • 1/4 cup instant coffee powder (in this case, we used Maxwell House orange cappuccino.)
  • 1/4 cupbutter
  • 1 egg
  • 3/4 cup milk (as needed)
  • 1 1/2 tsp vanilla
  • 1 cup fresh raspberries (or frozen if fresh are unavailable)
Topping:
  • 1/4 cup All Purpose Flour
  • 2/3 cup brown sugar (we used demerara... which is what B has on hand for when he randomly makes pies)
  • 1 tsp cinnamon
  • 1/4 cup butter
Heat the oven to 350 degrees F (175 C). This recipe can make a 9x13, but we opted for two 91/2 round pans so we could split the cake... half going to Clara and the other half to be devoured by our DnD group.

Anyway... grease and flour your pans. Make the topping first. Mix the dry ingredients in a bowl then cut in the butter until it makes coarse crumbs. Set it aside.

Mix the dry ingredients for the main part of a cake in a bowl (Flour, sugar, baking powder, salt, instant coffee). Cut in the butter until (again) mix is coarse crumbs*. In a measuring cup, crack the egg then add milk until it makes 1 cup. Stir the vanilla into the eggy milk thing.


*Both Sam and I were getting tired, so we handed off the fork to B the Pie Man and he took over for a while.

Add the milk, egg and vanilla to the dry mix until it's moistened and fold in the raspberries. Note that you don't want the batter to be completely smooth. Spread the mix in the bottom of the pan(s), apply the topping in whatever quantity looks good, and bake for about 25-30 minutes or until a toothpick slides out of it clean.

What The N00b Learned:
  • Don't cut the butter with the broccoli knife.
Verdict?

Fantastic. It's not overwhelmingly sweet, which would make it perfect with coffee. There's a hint of orange, but just enough to compliment the raspberry. Finally, because of the topping, you're hit with the faintest hint of apple crisp nostalgia.

Dinner tonight consisted of Sam announcing that she had a fair bit of broccoli in the fridge she 'really really needed to use'. We scoured our minds for Broccoli recpies that our very picky eaters (ie: The Guys) might enjoy.

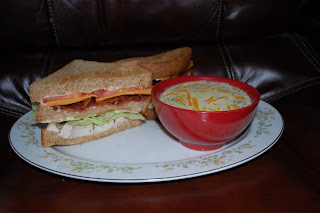
I figured broccoli soup might be good, even though I have a natural adversion to liquid food... But Sam was apparently a genius with soups in school and relished the opportunity to do this. Also, to go with the soup (remember, adversion to liquid food. I generally need something solid to eat with my taste of soup) I figured bistro style club sandwiches would be fun. So without much ado, Sam's recipe for homemade cream of broccoli soup!

What We Used
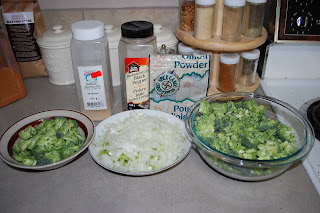
  • 2 stalks celery
  • 1/2 large onion
  • 2 heads of broccoli (florettes AND stems. Sam was adamant) chopped
  • Olive Oil
  • stock or water
  • Onion powder, black pepper, and garlic powder to taste
  • 2 cups Cream
  • Cheese

Sam started by chopping the celery and onion and set them aside in a bowl. She says you need to have everything prepped before you start adding stuff. Peel some of the skin off the broccoli stems (because it's a little tough) then chop the broccoli. Set a small portion of the broccoli aside for adding later (for texture).

Heat the oil in a soup pot. Oil measurements (according to Sam) vary according to the pot... and when I peeked into the vessel in question I noted that there was just a splash.

Sam Says: 'heat it enough so it coats the bottom of the pot. You can add more if needed'.

Add the onions, celery and the spices, then cook over low heat until onions are transparent. Try not to caramelize the onions because you don't want too much color.

Sam added a bit more oil and the broccoli (note: not the stuff you set aside. Hold that for later). Put in enough water or stock to cover the broccoli. We didn't have broth, though Sam mentioned it would be the best, and filtered water it was. Then the soup was set to simmer until everything in it was soft.

Sam did the honors of mulching the soup. Normally, you'd transfer it to a blender or food processor, but Sam has this handy dandy pot safe hand blender that she just stuck in the pot.

The next step was tempering the cream, which I'm going to hand over to Sam:

"Here is Sam's lesson on tempering cream! Tempering is necessary to prevent cream in soups and other hot dishes from curdling. What you need to do is put the cream in a bowl or some sort of dish that doesn't mind getting warm. Add the soup or whatever hot liquid it is you're using to the cream in small amounts while constantly stirring, until the cream itself is warm. Once all of it is warm, you can add it slowly to the pot!"

Needless to say, we added the cream gradually. Make sure you reduce heat first! After the cream is in, add the broccoli you set aside, taste and add salt or whatever spice you feel the soup needs. Then on low heat and stirring occasionally, wait for the broccoli to become tender.

Cheese can be served on top, or stirred into the soup at this point.

What the N00b Learned:
  • For cream based soups it's better to use white pepper(because of the color), though slightly less since it has a stronger flavor. We used black since it's what we had on hand.
  • I wish I had the POWER OF SCIENCE. My eyes are burning like hell.
  • Never boil soup. Simmer soup. Boil bad. Simmer good. Yay!
  • Don't cook your spoon.
Extra Extra:

Club Sandwiches are easy mode, but we can still give the construction order:


(starting at the bottom and going up)
  • Toast. We used whole wheat, thick sliced.
  • Mayo
  • Chicken. ( We butterflied and pan fried fresh chicken breasts, but I've seen places just use sliced chicken lunch meat.)
  • Lettuce
  • Toast.
  • Mayo
  • Bacon
  • Cheese
  • Tomato
  • Mayo
  • Toast.
We like mayo. Apparently


Verdicts?

The sandwich was perfect. Sam opted to pan fry with just salt, pepper, and grapeseed oil which gave the chicken a fabulous, subtle flavor. The soup was fantastic. We didn't need any salt, just a bit of cheese to top it.

What the Noob Learned:
  • Getting the core out of iceberg lettuce is simple. Just turn the head core side down and whack it on the counter a few times. Then pull the core out!!
-Jess

Bonus Mr Science says:

"The difference between oils is the length of the carbon chains on the glycerol. The difference between animal oils and plant oils is that animal oil is saturated and plant oils are not. But to make margerine, you have to hydroginate plant oil to make it more saturated."


Thank you Mr. Science!

Ugly Stepchild

We're having a difficult time finding the cord for the Nikon, so pictures may be a little late in coming (I'll add them when the rest of our merry band shows up and post up a notice that they're there.) but Sam and the rest of the whovians were pretty insistant that the TARDIS cake was glorious, especially since we were lacking almost all of our icing tools and the icing was a bit of a fiasco. (but not as much of a fiasco as the curdling cream cheese)

ETA: Cord is found, have an image!


It's like the children's drawing version of the TARDIS, turned into a cake. Note the spots where I apparently suffered a seizure.

If this doesn't end up on Cakewrecks, I'll be dissapointed.

-Jesso

Just to add

The lemon cake we did for Sam's landlady? According to B, it was 'like you had randomly made me a lemon meringue pie.'

Which is B-speak for 'you inadverdantly made the recipient's favorite cake'

-Jess

Monday, May 24, 2010

Ryan's Birthday and Doctor Who Monday

With the new season airing, we like to sit down every once in a while and catch up on episodes. This also meant we left dinner to Luke and commandeered the kitchen all afternoon to make a TARDIS cake, plus a twelve pack of chocolate cupcakes for the birthday boy.

Eager for a bit of a change, Sam and I switched our usual roles. (I tend to be Official in Charge of Icing, and Sam's the Cake Boss.) Almost immediately we both messed up and switched back to salvage what the other had done.

CHOCOLATE CAKE (adapted from this one)

What We Used*:
  • 1 cup butter
  • 1 3/4 cups sugar
  • 3 eggs
  • 1 1/2 tsp vanilla
  • 1 1/2 cups milk
  • 2 1/2 cups all purpose flour
  • 7 1/2 tbsp cocoa
  • 1 1/2 tsp baking powder
  • 1 tsp salt
Sam's mentioned that I should probably list the thing I messed up on first so it's not replicated. Butter and sugar needs to be creamed together until smooth, then beat in the eggs and vanilla.

In a separate bowl, mix together the remaining dry ingredients (Flour, salt, baking powder, cocoa). If you have a sifter, go for it... I didn't have one on hand but we didn't see much of a difference in the end.

Blend the dry ingredients into the butter mix, alternating with the milk. When everything is nice and smooth, pour into a greased pan. We used a 9x13 inch. Finally, set the oven to 350F (175C) and pop the thing in for about 25-30 minutes. Or until done. You know.

*We actually made a batch and a half for the cupcakes, so our measurements may be slightly off.

The icing was the same as the lemon butter cream, but minus the lemon and adding some mint extract to taste. For some reason, this one was making us struggle with consistency and I spent a long time with the hand blender barking 'Milk.' at Sam to make it less hard. Also involved a lot of blue coloring.

All in all, this cake is like the ugly stepchild I keep in the attic. I love it, but am ashamed to let it see the light of day. Ergo, unless Sam can twist my arm, no pictures tonight.


What the N00b Learned:
  • Cream butter and Sugar together. Makes it easier to get smooth.
  • Not every pan is going to be awesome like sam's. Let the cake sit for a while.
-Jesso


Sunday, May 23, 2010

Experimental Frittatas and Carrot Cake for 'B

I have ridiculous amounts of random stuff in the fridge and very little funds, so the Kitchen of Dispair put together a sunday night Frittata.

A frittata is like a crustless quiche... Eggs, cheese, stuff. In this case I had three of L&D's in store made sundried tomato and turkey sausages hiding in the freezer and begging for a home that became the base of this experiment.

What We Used
  • 6-8 Eggs (Depends on the size of the eggs and the size of your frying pan/skillet)
  • Splash of milk (we're so scientifically accurate here.)
  • 3 sundried tomato and turkey sausages
  • 1 1/2 cups Spinach (We use fresh. That's our choice to make, though Sam is pretty adamant it would be best with fresh.)
  • 1 clove garlic
  • 1/2 sweet onion
  • cooking oil (We used grapeseed. Olive would also work if you want a bit more flavor)
  • 1 cup cheese (rough estimate. Though we like cheese, so it may have been more)
  • pinch of salt
We started by prepping everything. The cheese was grated, the egg was whisked with the milk and salt, spinach was chopped, onion was diced, garlic was minced, and of course, the sausages were uncased.

(Sam Says: "I wouldn't wish this on anyone... Gah, the casing smells!")

We heated the oil being used in a frying pan, and once the oil was hot we browned the onion and the garlic. After the onions and garlic were caramelized, we added the sausage. Note that by this point Sam had completely forgotten the casing smell and was waxing poetic about the lovely aroma wafting from the stove top.

When the sausage was almost completely cooked, the spinach was added. This gave the whole mix in the frying pan a lovely color. Sam also turned up the heat on the stove a bit to attempt to cook off some of the excess liquid being created by the spinach.

The heat was turned down again and the egg mixture was added. Sam opted out of putting the cheese in right away ("Cheese will do nasty things to this frying pan...") and we stood staring at the mix while it cooked just enough to pull away from the sides of the pan.

(Sam Says: "Cooking a Frittata can be helped along by putting a lid on!" *Puts lid on frying pan*)

We, of course, got to do things the hard way and transfered the entire thing to a round cake pan (in fact, one of the ones we've been using pretty extensively lately), topped it with cheese and dumped it in the oven under the broiler. (This dish transferring problem, of course, could've been solved by the cast iron skillet we don't own.) Also note that the frittata doesn't need to be completely cooked when it goes into the oven.

Verdict?

Mmmmm.


The sausage already had spices in it, and Mr. Divider Pallette (Sam's Husband Thing) couldn't pick out a single overwhelming flavour. So all in all, a success! I liked the fact that unlike a lot of quiche we didn't need to add salt.

We also promised Sam's husband-thing a carrot cake, so one was made. No recipe for that (it was Betty Crocker cake-inna-box) but the cream cheese icing in the container suffered an....incident.... and we were forced to go for scratch. Which I have no problem with.

Cream Cheese Frosting!

I tried to keep better tabs on my amounts this time, for recipe sake.

What We Used

  • 250 g (1 package) cream cheese
  • 1 cup icing sugar unpacked
  • 1 tbsp milk

Again I creamed the base, in this case the cheese, then slowly added the sugar. The milk was an afterthought for the proper consistancy. Note: If you're adding food coloring, the icing may get runnier.

I'm getting a bit better at piping too... Though other than that, nothing fancy with the decoration besides a big squiggly 'sup guys!'.


What the N00b learned:

  • Don't use whipping cream in an attempt to stretch store bought icing. It curdles (?!)
  • A 'Splash of Milk' is a legitimate term. (According to Sam.)
  • The big button on the back of the mixer is eject, not 'go faster'.

-Jess

Buttercream, you're doing it wrong.

I'm not going to post the recipe for the cake from yesterday... It's not really our recipe in the first place (though I will provide a link. This is the base we used, and I suspect there will be much more variations on this theme in the future. This was one of the better looking ones that didn't involve cream of tartar or coconut milk or somesuch.)

I can, however, let you in on my Lemon Buttercream!

When looking for a 'proper' recipe for this stuff, we came across one that asked for a tablespoon of butter and about a cup of confectioners sugar. That was when we decided this was stupid and was probably going to come down to us eyeballing it.

You will need:

  • Butter
  • Icing sugar
  • A lemon

I think, all in all, I used about a cup and a half of butter. Naturally, you don't need to use this much (especially if you're not planning on holding on to some of it to jam into a piping bag) so start with a half cup.

Cream the stuff. Smash it into smaller chunks with a wooden spoon and then hit the eggbeaters until it's soft.

I eyeballed the icing sugar and ultimately have no clue how much sugary goodness was tossed in, but add it gradually. TASTE IT. You'll know when you're starting to develop the flavor you want. It has a sweet, vaguely buttery taste. Which is obvious considering the current ingredients.

Check your amounts. Does it look like you'll have enough for your cake/cupcakes/to spoon into your face? Add more butter. Add more sugar. TASTE AGAIN.

Meanwhile, Sam had pre-beaten a lemon. Apparently, if you beat it up nice and good, when you finally cut it in half and start squeezing the juice into a seperate bowl it'll be an easier time, and you'll most likely get more juice in the end.

I added the lemon juice half at a time. Again, taste it... Is it the right amount of lemony-ness for you?

The buttercream will probably be a yellowy cream color at this point. Don't worry about it, as my erstwhile master explained to me, it'll lighten up the more it's beaten. If you're looking for a pure virgin white experience, this probably means you'll be sitting there at the counter for a while, but it won't change the flavor if you don't mind yellow icing. Also consider how light you want it for whatever food coloring you're planning to put in, if any.

What the n00b learned:

It's important to abuse your citrus.

-Jess

Saturday, May 22, 2010

Suddenly, Lemon Cake!

With Sam getting back into the swing of things and myself learning the fine art of cake from scratch, Sam's landlady's mentioning that her sister's birthday was tomorrow made a good launching point for the Great Cake Experiments.

This cake wasn't really a lemon cake in the truest sense... It was actually a vanilla cake with lemon buttercream frosting and lemon pie filling in between the layers. It's a bit lopsided, and the piping could be better... but hey... I'm an icing virgin and Sam was suddenly in desperate need of food due to blood sugar dropping so it was up to me! I was also the one that went a slight bit insane with the lemon slices. I don't even know.


Needless to say, despite her involvement, the sheer amount of citrus in this thing would've sent Sam into some sort of rashy allergy fit so I did a lot of the handling once the lemon juice went in. Bev thought the thing was great when it was delivered, probably moreso since I doubt she was honestly expecting a cake in such short order, so for a first attempt we're pretty proud.

What The N00b learned:

The more you whip buttercream, the lighter it gets! In hindsight this is incredbly obvious but I'm glad I know it now, especially since the icing was a bright yellow color when I began.

We also figured that I'm Sam's perfect Sous Chef. Most of the icing process consisted of me carefully measuring out our resources and Sam just slathering the stuff on despite my slightly pained expression.

-Jess

And Then it Began

It started when I got fired.

Wait.

It started when Sam went into Culinary Arts, I think. That's when the big decision that food was to be her life happened, with the commitment that comes with laying down a few grand worth of tuition fees. My getting fired was the catalyst*.

So here I was, unemployed, bored, restless, depressed, and yet being encouraged by this Sam person whenever I made myself a veritable mountain of comfort food that hey, I'm kind of good at this cooking thing despite my inability to use a knife with any sort of proficiency.

And, Sam insisted, she was a chef-in-training and I was a former graphic designer with a touch in the kitchen. Obviously this meant it was time for cakes.

The support we're getting for this little adventure is great. In fact, we're filling our first non-paid-commission/project-thing today with a simple white cake with lemon buttercream frosting. It's currently an interesting mix of smells in the Kitchen of Dispair with the overwhelming smell of lemon zest in one corner, and a chicken carcass slowly being turned into stock simmering in the other, and I have a good feeling about it all.

The blog thing, well, I'm going to credit the inspiration for this to the heavenly Miss Kat who's love of butter should be an inspiration to us all, and will be my first shout out for food blog saturday. Stay tuned for cake updates later today!

-Jess


*I'm not going to get into the being fired bit. It was a bit of a situation that I still don't feel was treated fairly, but it's in the past (regardless of how much it affects my inability to get hired right now...)